Monday, June 24, 2013

Fasolakia (Green Bean Stew)


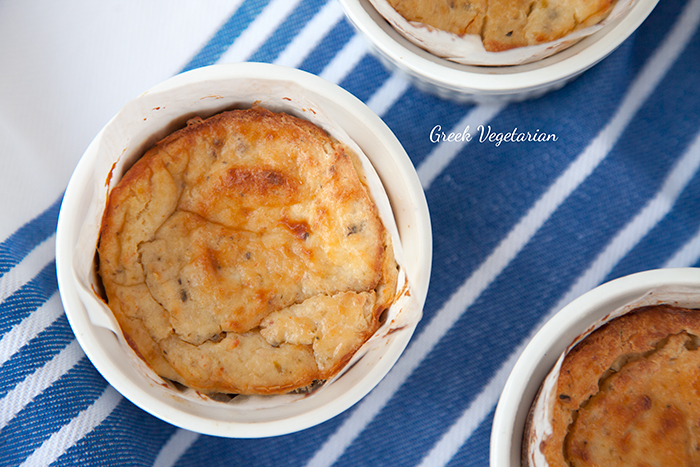
Beautiful, tender green beans cooked slowly in a tomato-based sauce is the perfect companion for a wonderfully light but protein-rich serving of Greek baked ricotta. This is my new favourite meal at the moment. I'm absolutely going green bean bananas for it!


Stewed green beans, or Fasolakia, is a delicious winter warmer that can transport you to a place of comfort and happiness :) I've been cooking beans this way for a while but never had I appreciated their amazing accompaniment abilities until I served them up with baked ricotta.

There are so many different types of vegetable stews in Greek cuisine, most of them slow cooked and often served with feta cheese crumbled over the top so it's no surprise that ricotta goes so well with Fasolakia.

Slow cooking Fasolakia sweetens the onion and tomato and tenderises beans. Putting this stew together is easy – it just requires a bit of patience while it's cooking as it needs more than an hour to cook. The upside is that you can make your baked ricotta while the stew is cooking, and the aromas from your kitchen will send you to that comfortable, happy place before you even get to eat the beans!

Perfect as an accompaniment for a Meatless Monday meal, I have no doubt that Fasolakia will win you over. It has that way with people :)

Fasolakia (Green Bean Stew)

Adapted slightly from the recipe for Greek Fresh Green Beans on the Authentic Greek Recipes blog.

The recipe for Greek Baked Ricotta can be found here.

Makes 6–8 serves

Ingredients

  • 1 kg fresh green beans
  • 100ml good quality olive oil
  • 2 onions, peeled and grated
  • 4 cloves of garlic, minced
  • 8 roma tomatoes, peeled and chopped (or one 400g can of peeled, chopped tomatoes)
  • 100ml water
  • Salt and pepper to taste
  • 2 tablespoons fresh parsley, finely chopped

Instructions

  1. Wash and trim ends from beans. Set aside.
  2. Heat oil in a large, heavy based pot. Add grated onions and fry over low–medium heat for a few minutes.
  3. Add the beans and the minced garlic and fry, stirring, for another minute or so.
  4. Add the tomatoes, water, salt and pepper to taste.
  5. Cover pot and simmer on very low heat for 1 hour and 20 minutes.
  6. Add the parsley, increase heat to medium and allow to simmer, uncovered, for around 5 to 10 minutes until any watery liquid has evaporated and all you are left with is a thick, tomatoey sauce.

I'm linking up again with the ever-resourceful Veggie Mama this week, on her Meatless Mondays segment. This week she's been doing a bit of slow-cooking herself.


Saturday, June 22, 2013

Greek Baked Ricotta with
Green Olives, Lemon and Oregano


We have been fortunate enough to have had some sunny days this week but with temperatures barely reaching double figures, the sun has struggled to make a dent on the temperature inside our freezing house. I envy those of you with good heating and insulation, and even more so, those of you in the midst of summer right now. But with our Winter Solstice ticking over yesterday it's comforting to know the days will now be getting longer, and hopefully warmer!


I find it fascinating that in some parts of the world the winter days can be as short as a few hours, and in summer the sun can shine for almost 24 hours. Here in Melbourne the earliest that we will reach darkness on a winter's evening is 5.30pm. It's way too early for my liking but I shudder to think how it must be for those living in midday darkness in the far northern parts of the world.

Perhaps we take for granted our relatively even days and nights here in Australia, but I always feel just a little bit happier once we get past our shortest day of the year.


It's hard to venture outside when it's so cold, but when it's colder inside your house than it is outside there's no excuse. So I layered up with a long-sleeved t-shirt, two jumpers and a puffy quilted jacket today and stepped out into the sunshine to take a walk down to our local grocery store. All I needed was some eggs but as usual, left the store with two bags of shopping. I just can't help myself. What can I say? I love grocery shopping :)

I've been wanting to make a Greek-style baked ricotta dish for ages. All the recipes I'd seen used chillies and basil to flavour the cheese. I needed to Greekify this one and I knew that the marinated green olives that some how found their way into one of my shopping bags today would do the trick. Along with some grated lemon rind, oregano and sharp cheese, I couldn't wait to see how this combination of flavours would come together in a fluffy little mound of golden baked ricotta.


Another dish I've been meaning to feature here on the blog is Fasolakia, or Green Bean Stew, which is one of my favourite Greek vegetable dishes. Usually served alongside meat, these beautifully tender beans make the perfect accompaniment to a protein rich serving of baked ricotta.

But you're going to have to wait for my next post to see the recipe for Fasolakia. Today it's the baked ricotta's turn to shine, especially since it came out so beautifully golden and delicious. Just like the sunshine today :)


Greek Baked Ricotta with Green Olives, Lemon and Oregano


The recipe for Fasolakia (Green Bean Stew) can be found here.

Serves 6

Ingredients

  • 600g firm ricotta cheese, roughly chopped
  • 2 eggs, lightly beaten
  • Grated rind of one lemon
  • 1/2 cup grated sharp cheese
  • 1/2 teaspoon dried oregano
  • 20 pitted green olives
  • Salt and pepper to taste

Instructions

  1. Preheat oven to 180 degrees celsius.
  2. Grease 6 small ramekins (around 8cm diameter) and line with baking paper, buttering baking paper as well. Make sure the baking paper comes up around 2cm above the rim of the ramekins.
  3. Blend ricotta, eggs, lemon rind, sharp cheese, oregano, olives, salt and pepper in a food processor.
  4. Spoon mixture into ramekins and bake for 30 to 40 minutes, until ricotta has risen like a souffle and tops are golden.
  5. Remove from oven and allow baked ricotta to sink before removing from ramekins.
  6. Once cool enough to handle, turn ramekins out onto the palm of your hand – the ricotta mound should fall out easily.
  7. Carefully remove baking paper and serve with Fasolakia (green bean stew).


Wednesday, June 19, 2013

Fresh Asparagus Salad with
Feta, Avocado and Thyme


It's been raining every day for almost two weeks here in Melbourne where we live. We're right in the depths of a miserable winter in our part of the world and I can't wait for it to end. And end it will on August 17 when my partner Tony and I get on a plane to go to Greece for a four week holiday.

Both Tony and I are freelancers working from home – Tony a software developer, me a graphic designer and photographer. Weekends blend into week days and it's rare for us to find time to just relax and hang together.

Tony's always been crazy busy, but for me this is all new. Before I took a redundancy package from my previous employment I was twiddling my thumbs at work. Hence the redundancy package. But since February this year I've been working pretty much every day solid as a freelancer. The jobs just keep coming. But the best thing about working so hard is that it makes me appreciate how important it is to take holidays :)

Tony and I are literally counting down the days before we leave for Greece – only 59 days to go! We will be spending the first two and a half weeks in Limnos at the family house, then a few days in Athens, four nights in Santorini and a couple of nights in Singapore to break up the long flight home.

My dad, his brother George and my aunt Koula will also be staying at the house in Limnos while we're there. It will be lovely to spend time with family and I can't wait to get cooking with Koula again – imagine the material for the blog!

I'm also planning on stocking up on a stack of authentic Greek cookware and utensils while I'm over there and would love some of my Greek readers to advise where I can find these things. Are there any markets or specialty kitchen stores in Athens you can recommend?


So for the next 59 days Tony and I will dream of warm sunny days in Greece as we struggle to keep our extremities thawed. Our house has a rubbish heater and terrible insulation. I'm not kidding when I say I'm wearing a scarf and rug over my legs as I type.

I really struggle with this weather. My Greek body just isn't designed to tolerate the southern hemispheric cold. Even Tony who is of Scottish–German descent hates the cold as much as I do. Every year we go through six months of pain and anguish (yes, that really is how the cold affects us) and keep asking ourselves – why do we live here?

Melbourne is a cultural, arty city with a great cafe and music scene, but the weather for us changes everything. In winter we can't enjoy what Melbourne has to offer because it's so hard for us to venture outside when it's so bitterly cold.

The further north you travel in Australia, the warmer it gets, and we have our sights firmly set on the city of Brisbane in Queensland as our preferred place to live. We've talked about it for years, and finally we are doing something about it. When we get back from Greece we will start making plans for the big move.

The next few months are going to be enormously hectic for us. So much work to get through before we go to Greece, then uprooting our lives to move interstate before the end of the year. These are huge changes but we're so excited about all of it.

Today, at last, the sun is out but the ice I can see forming at the base of my window tells me another story about what's really going on out there. Nonetheless, I can still look out at the blue sky and convince myself that it's summer, and that the air-conditioning is turned up exceptionally high in the house.

But even when it's freezing, everything takes on a new light when illuminated by sunshine. Gum leaves reflect a golden hue, spots of white jasmine still cover our fences and the turtle doves peck around in sunny spots on the grass. It's not summer but it looks like summer. So much so it makes me want to make a salad.

A native plant to the eastern Mediterranean regions, asparagus has been used in Greek cuisine since ancient times. The unique flavour and juicy crunch of fresh or lightly steamed asparagus needs little added to bring this wonderful vegetable to life.

Today I have combined it with some crumbled feta cheese, avocado, fresh thyme, good quality extra virgin olive oil and a big squeeze of lemon juice to make a summery salad that can be enjoyed from a sunny window on a cold winter's day.


Fresh Asparagus Salad with Feta, Avocado and Thyme


Serves 4

Ingredients

  • 16 asparagus spears
  • 1 avocado
  • 1 Lebanese cucumber
  • 100g feta cheese, crumbled
  • 2 tablespoons extra virgin olive oil
  • 3 tablespoons lemon juice
  • 1 teaspoon fresh thyme leaves

Instructions

  1. Remove tough ends from asparagus then slice thinly in diagonal cuts, leaving the spearheads intact.
  2. Peel and slice avocado thinly, and cut into 2cm squares.
  3. Peel and slice cucumber lengthwise, then cut into 2cm squares.
  4. Toss all the vegetables together, arrange on a plate and sprinkle feta cheese over the top.
  5. Drizzle olive oil over salad and squeeze the juice of half a lemon over the top.
  6. Sprinkle with fresh thyme leaves and enjoy.


Thursday, June 13, 2013

Vegetarian Stifatho (stew)
with Swiss Brown and Oyster Mushrooms


I have a lot of love for mushrooms. Especially portabella or Swiss brown mushrooms. Did you know Swiss browns (or creminis) are just small portabellas? I only found this out a few weeks ago. I know, I'm so unworldly. But no matter how uneducated I may be about mushrooms, I do know something, and that is that I do not like oyster mushrooms. Definitely NOT a lot of love for those rubbery things let me tell you.

Admittedly, my exposure to oyster mushrooms has been limited to the way they are prepared in Greek restaurants. Namely Limnian Greek restaurants. You may know about the family connections I have in Limnos and the annual pilgrimage Tony and I make to the island to get away from Melbourne's bitter winter, if only for a few weeks. We are counting down the days to our next trip over there in August – for the warm days, the time spent with family and the wonderful food.

In Limnos lunch is usually enjoyed with the family out on the shady terrace of the old house, but dinner time is when Tony and I venture out to explore the local tavernas.

When ordering something from a Limnian menu that is accompanied vegetables, you will indeed receive a side serve of very lovely stewed or baked vegetables ... but be prepared to find that your vegetables will also be sharing space with a good pile of dreadful oyster mushrooms. I kid you not. Every side serve of stewed vegetables I've received at a Limnian taverna has contained oyster mushrooms. All I can say is this: Oyster mushrooms. Yuck.

Come on, let's be honest here. They're rubbery, slimy and chewy – I reckon that's the real reason why they call them oyster mushrooms. Surely it's not just because they look like an oyster shell.

Every year in Limnos I try my darnedest to warm to these peculiar morsels. I keep trying to convince myself that I'm just culinarily immature and that one day I'll learn to appreciate the rubbery, sea-kelp texture of oyster mushrooms. But is it really just a matter of an acquired taste or have the Limnians just been cooking them the wrong way?

The flavours of a classic Greek Stifatho (stew, usually made with rabbit or chicken) are strong and aromatic. Cinnamon, cloves, garlic, sweet onions ... robust flavours that dominate the dish. These flavours could easily mask the taste of the mildly-flavoured oyster mushroom. But what about the texture? Stifatho is slowly cooked for almost two hours. Could slow cooking oyster mushrooms soften and tenderise them? I couldn't wait to find out.

The innocent oyster mushroom stood a real chance in my kitchen yesterday. Paired with a bunch of Swiss browns I was sure I could produce the most delicious Vegetarian Stifatho AND make a hero of the poor old oyster mushroom.


It's amazing what you discover when you least expect it and cooking often presents the most unexpected surprises. Now we all know that mushrooms release liquid when they're sautéed, but these oyster mushrooms were absolutely gushing it out. So much so, the mushrooms themselves almost completely disappeared, leaving nothing but a pot full of liquid and a few stems! I was fascinated. Where did all those fins and big floppy bits go?

The other thing I discovered was that stewing oyster mushrooms for nearly two hours doesn't change their texture. They stay exactly how you left them at the end of the sautéing stage (as sparse as their remains may have been). Rubbery oyster mushroom stems were still rubbery oyster mushroom stems.

But in all honesty, this dish had all the flavours of a delicious Greek Stifatho that you would expect, without the meat. It really was quite lovely. I think the bizarre disappearing act of the oyster mushrooms when sautéing saved this dish as far as my textural issues go. And the few oyster mushrooms that were left actually made the stew a little more dynamic than it might have been with just Swiss brown mushrooms. I love serendipity!

Vegetarian Stifatho with Swiss Brown and Oyster Mushrooms


Serves 4

Ingredients

  • Olive oil for sautéing
  • 20 small pickling onions, peeled and left whole
  • 400g Swiss brown mushrooms, roughly chopped
  • 300g oyster mushrooms, roughly chopped
  • 3 cloves of garlic, roughly chopped
  • 1 cup of dry white wine
  • 2 whole cloves
  • 1 can of peeled and chopped tomatoes
  • 1/2 teaspoon cinnamon
  • 2 bay leaves
  • Salt and pepper to taste

Instructions

  1. In a large, heavy-based pot, sauté the onions in olive oil, browning on all sides. Remove onions from pot.
  2. Add mushrooms to pot and sauté until copious amounts of liquid is released and oyster mushrooms almost disappear. Allow to simmer until liquid is almost all gone.
  3. Add garlic to mushrooms and sauté for around 1 minute, stirring constantly.
  4. Add wine to the mushroom mixture and simmer for a few minutes.
  5. In a small cup, place whole cloves and 2 tablespoons of boiling water. Allow to steep for a few minutes, discard cloves, and add clove water to mushroom mixture.
  6. Add onions, tomatoes, cinnamon and bay leaves to pot and stir until well combined. If there is not enough liquid to just cover all the ingredients in the pot, add a little water or vegetable stock.
  7. Cover and simmer on very low heat for around 1 hour, without stirring.
  8. After the hour, season to taste with salt and pepper and stir gently, being careful not to break up the onions, and leave to simmer, covered, for another 30–45 minutes, until sauce has thickened.
  9. Remove bay leaves and serve over rice or mashed potato.


Friday, June 7, 2013

What does a Greek Vegetarian eat
when she's not eating Greek food?


When I was asked by one of my favourite bloggers, Kiersten from Oh My Veggies to write a guest post for her "What I Ate This Week" segment, I was over the moon. Not just because of the honour to contribute to such a widely respected blog, but also because it gave me the opportunity to blog about some of the food I eat when I'm not eating Greek food! Like this Stir-fried Tofu and Walnut Crumb Salad.

Head on over to Kiersten's blog to see what I ate this week and to also discover (if you haven't already) a truly wonderful and inspirational blog with a huge selection of the coolest vegetarian and vegan recipes and ideas.


Thursday, June 6, 2013

How not to bake a Chocolate Pear Tart


Baking is not one of my strongest points. Funnily enough, some of the things I bake look really pretty, but they usually taste pretty ugly.

Take this pear tart for example. Looks lovely. Doesn't taste so lovely.

And that's certainly not the fault of the recipe. In fact, I based it on a recipe from Kitchen Stories which features many gorgeous Greek recipes, all of which I am sure are well proven. "Based" being the key word here. If I had have followed the recipe to the letter I'm sure this tart would have tasted amazing, even with my bad baking skills.

Unfortunately, my creativity got the better of me and my decision to use olive oil in the shortcrust instead of butter made this tart very challenging indeed! Not to mention, strangely tasting. Oh I know, don't yell at me...


On the other hand, using yoghurt in the filling instead of sour cream as was called for in the original recipe wasn't such a bad idea. I quite like the extra tartness that yoghurt imparts with sweet chocolaty things. But then again, I'm sure sour cream would have given this tart a much more appropriate custardesque filling.


But hey. I'd just bought a massive bag load of pears and really wanted to make something Greek with them. Why I didn't do something classic like honeyed pears or Apithea (stewed pears) escapes me, but lessons are learned this way, and I know I won't be using oil as a substitute for butter in shortcrust again!


For obvious reasons, I am not going to outline my version of the recipe here. I'm sure you'll have much greater success baking this tart if you follow this recipe :)


Sunday, June 2, 2013

Three Greek ways to cook a turnip:
Turnip Skorthalia, Turnip Chips, Turnip and Feta Fritters


Ever since discovering the brilliant recipe for low-carb moussaka, Tony and I have been wanting to experiment with one of the dish's key ingredients, the humble turnip.

Having never eaten a turnip before, we were pleasantly surprised by both the flavour and texture of this amazing vegetable and its incredible likeness to potato.

The turnip worked brilliantly as a potato replacement for the moussaka so I was keen to see how it would perform in other potato-based goodies like rosti, cheesy mash and, of course, traditional Greek mezes (appetisers) such as skorthalia (garlic dip), tiganita lahanika (fried vegetables) and keftethes (fritters or croquettes).


Skorthalia is a strong, garlic-flavoured dip that traditionally uses a soaked bread or mashed potato base. If you love a good hard garlic bang in the face, you'll love skorthalia. Of course you can regulate the amount of garlic that goes in but you ought to know, a big garlic hit is the big Greek way.

More importantly though is the fact that turnip works beautifully with this dip and produces exactly the same visual and textural result as skorthalia that is made with bread or potato. Flavour wise, I think turnip skorthalia is even better than the potato or bread versions as the sweetness of the turnip helps to balance the sharpness of the raw garlic.


I love a good plate of fried zucchini chips but have never been able to master the thin and crispy batter used for this classic Greek taverna meze. The batter should be similar to tempura batter but mine invariably turns out more like pancake batter. I know the recipe is simple but somehow I always manage to revert to some crazy notion in my head that batter needs to be pancake-thick. No matter what the recipe says. Crazy, I know.

So needless to say, my turnip chips didn't come out that great. Thickly battered and sloppy. Surprisingly, they still tasted ok, and to my own defence, they were actually crispy for the first five minutes.

The turnip needs to be sliced super thin for these chips so that it cooks quickly enough to keep up with the lightning fast cooking speed of the batter, especially if your batter is gorgeously thin and light. Go on, make your perfect tempura batter and whip up a batch of these wicked turnip chips – I'm sure they'll turn out way better than mine :)

Yes, that's right, the turnip chips are the ones on the far left of these photos. Stop laughing.


Vegetable fritters are one of my favourite Greek mezes. Usually made with grated zucchini, pumpkin, potato or eggplant, it wasn't hard to imagine how yum these would be with turnips. I used a standard Greek recipe for vegetable fritters mixing together a bit of flour, egg, onion, feta, herbs and spices with the turnip, then shallow frying.

These turnip fritters were the biggest success of the three experiments – my thick batter routine really shined with this one. Golden and crunchy on the outside and melt-in-the-mouth soft on the inside. I was also very impressed with how well my choice of spice (cumin) went with the turnip. Best of all, these are absolutely delicious dipped in tzatziki, or turnip skorthalia!

So without further ado, here are the recipes!


Turnip Skorthalia


Makes around half a cup

Ingredients

  • 1 turnip, peeled and cubed
  • 1/2 clove of garlic, crushed
  • 1 tablespoon extra virgin olive oil
  • Squeeze of fresh lemon juice
  • Salt to taste

Instructions

  1. Boil the turnip for 15–20 minutes until tender.
  2. Blend turnip with a stick blender, then add garlic, olive oil, lemon juice and salt to taste. Blend until smooth.

Turnip Chips


Makes a big bowl full

Ingredients

  • 2 turnips, peeled and thinly sliced
  • 100g plain flour
  • 1/2–1 cup water
  • 1 egg, lightly beaten
  • 1 teaspoon salt
  • Oil for frying

Instructions

  1. In a large bowl, mix enough water (between 1/2 and 1 cup) with the flour to create a thin batter.
  2. Add the egg and salt and mix well.
  3. Dip the turnip slices into the batter and shallow fry in hot oil for a minute or so each side, until golden.
  4. Drain on paper towels and season well with salt.

Turnip and Feta Fritters


Makes around 20–30

Ingredients

  • 2 turnips, peeled and cubed
  • 1 brown onion, peeled and finely chopped
  • 200–250g flour
  • 1 egg
  • 1 teaspoon cumin
  • 1 tablespoon fresh mint, finely chopped
  • 100g feta cheese, crumbled
  • Oil for frying

Instructions

  1. Boil the turnip for 15–20 minutes, until tender. Drain and set aside.
  2. Meanwhile, fry the onion over medium heat until transparent and lightly golden.
  3. Put cooked turnip, onion, flour, egg, cumin and mint in a food processor and blend until a thick batter is formed. Add more flour if necessary.
  4. Transfer mixture to a bowl and add feta, stirring until just combined.
  5. Heat about 1cm of oil in a pan and gently spoon blobs of batter into the oil. Allow to fry for a couple of minutes before turning.
  6. Once fritters are golden brown, remove from pan, drain on paper towels and season well with salt.
Today's post is linked up with Veggie Mama's Meatless Mondays. Go take a look for some lovely vegetarian recipes and ideas.